Essay
Information Security Specialist Diploma. Part No. 4 - Smart Connect Mobile Application
A short preface Hello, Habr! This article is the fourth in the “Diploma of an Information Security Specialist” series, in which I talk about my experience in writing a final qualifying thesis for...
A short preface
Hello, Habr!
This article is the fourth in the series “Diploma of an Information Security Specialist,” in which I talk about my experience in writing a final qualifying thesis for the higher education program “Computer Security.” B previous article I described the process of developing a portable IoT device “SmartPulse” with the implementation of security mechanisms from the methodology for ensuring the security of Internet of Things devices, which I proposed in first part this series of articles. In this article we will talk about the creation of the Smart Connect mobile application, with the help of which I implemented the management of previously developed Internet of Things devices.
If you have not had time to read the previous articles in this series, I advise you to read them first in order to better understand the context of what is happening.
Smart Connect mobile app
Mobile application for IoT devices based on the DALL-E neural network
After two IoT devices have been designed and assembled: SmartLight without implementing protection mechanisms and SmartPulse With the implementation of these mechanisms, the need arose to create an application with which one could interact with them in the most comfortable way.
Since I had never had to write any software for mobile platforms before, I decided to focus on the mobile application. I wanted to be able to gain new experience while writing my final qualifying thesis, and not just do it “for fun” for the sake of a grade. Therefore, I realized that I would try to understand mobile development in order to gain this new experience. Well, in my opinion, the best and most logical way to interact with Internet of Things devices is through a smartphone.
Mobile application concept
The idea of the Smart Connect mobile application, in my understanding, was to provide separate control of devices. I would like to work on the concept of a dashboard with information displayed on all devices on one screen, but as part of my thesis, I limited myself to two separate profiles. That is, first the SmartLight and SmartPulse devices should be displayed on the main screen of the mobile application, and then the user can go to the control panel of the device he needs for further interaction with it.
Programming language and framework
When I decided to write a mobile application, I began to choose what I would like to work with more. Basically the choice was between React Native or Flutter. I didn’t consider Swift in principle due to its narrow focus on Apple devices (although in the future I think a little closer please familiarize yourself with it). I know that the choice sounds somewhat funny, but in fact it is not, because at that time I had experience working with React.js. Since I had never tried my hand at mobile development, I saw React Native as something more familiar and familiar.
In the end, I still chose Flutter and, accordingly, the Dart programming language. My choice is due to the greatest popularity of Flutter, which in the end got the better of me. I can say that I did not regret my decision at all.
Operating system and other subtleties
It so happened that I am the owner of an iPhone 12 Pro Max, so I had no choice but to write a mobile application for the iOS 17.1.2 operating system.
In order to build and run a Flutter mobile application on an iOS device, you need to install Xcode. In addition to the official development environment, you also need an Apple Developer account.
To work with a physical device and install all app builds directly on the iPhone, I switched it to developer mode.
You need to generate a Bundle ID for the application you are developing, but there is nothing complicated about it. The main thing to remember is that you should not generate a new ID after each new build (if someone for some reason wants to do this), since Apple issues a limited number of IDs per developer during the week.
I didn’t need any more preliminary procedures for developing for iOS. I don’t see any point in writing about installing Flutter, setting up the environment, etc. I leave a link to official documentation Flutter with iOS development.
SmartConnect app code
According to an already established tradition, the entire code can be seen in the repository on GitHub , as well as in the attachments to my VKR . As part of the article, we will analyze the most interesting fragments. In the usual way, we will divide all the code into structural blocks.
|
Structural block |
Purpose and functionality |
|---|---|
|
Libraries |
Importing libraries |
|
MyApp class |
The main application class that inherits from StatelessWidget. Creating a UI application with a dark theme and the FindDevicesScreen home screen |
|
FindDevicesScreen class |
Display and scan available Bluetooth devices. Includes AppBar, RefreshIndicator and StreamBuilder |
|
Navigating to device management screens |
Logic to navigate to device screens (DeviceScreen, SmartPulseDeviceScreen) depending on user selection |
|
DeviceScreen class |
Class for interacting with SmartLight |
|
SmartPulseDeviceScreen class |
Class for interacting with SmartPulse |
|
State and Data Management |
Functions for sending commands and reading data from devices |
|
Widgets |
Defining widgets for display Displaying information, text fields and buttons |
To implement data transmission via BLE, I used
flutter_blue
, which must initially be registered in
pubspec.yaml
. Here we immediately add
flutter_launcher_icons
, in order to later replace the default Flutter application icon with your own.
dependencies:
  flutter:
    sdk: flutter
  cupertino_icons: ^1.0.2
  flutter_blue: ^0.8.0

dev_dependencies:
  flutter_test:
    sdk:flutter
  flutter_lints: ^2.0.0
  flutter_launcher_icons: ^0.13.1
Next, after updating all dependencies via
flutter pub get
, you can start writing the main code of the mobile application.
Since the Smart Connect mobile application is necessary exclusively for interaction with the previously developed SmartLight and SmartPulse, when scanning BLE servers with a mobile device, we artificially limit the display of the list of devices available for connection to two specific ones. In the development of each of these devices, I explicitly indicated the name of the BLE server, so we can implement this process simply by name. Although in the case of designing commercial devices, I would not recommend doing this because of possible problems associated with the same device profile names.
// Handler for clicking on a list element
onTap: () {
  if (device.device.name == 'SmartLight') {
  // Go to the corresponding screen
    Navigator.of(context).push(MaterialPageRoute(
      // Go to DeviceScreen
      builder: (context) =>
      DeviceScreen(device: device.device),
    ));
  } else if (device.device.name == 'SmartPulse') {
      Navigator.of(context).push(MaterialPageRoute(
        // Go to SmartPulseDeviceScreen
        builder: (context) =>
        SmartPulseDeviceScreen(device: device.device),
      ));
  }
}
To interact with the SmartPulse device, I created a separate class in which I separated the device control logic from all other code.
In it you can see the process of reading the value of the pulse sensor characteristic. Once a second, a new value of the characteristic is read, the identifier of which is specified explicitly. It is then written to a variable
pulseRate
. In the future, we will display the value of this variable on the smartphone screen.
// Create a subscription to the heart rate data stream
_pulserateSubscription =
        Stream.periodic(Duration(seconds: 1)).asyncMap((_) async {
        // Read device characteristics (heart rate)
        List value = await readCharacteristic(
            widget.device, Guid('0000fef4-0000-1000-8000-00805f9b34fb'));
          int pulseRate = (value[0]);
          return pulseRate;
    }).listen((pulseRate) {
      // Update the widget state with the new heart rate value
      setState(() {
        this.pulseRate = pulseRate;
      });
    });
In order for the process of reading the contents of any BLE characteristic to be feasible in principle, we create an asynchronous operation.
// Method for reading characteristics
Future> readCharacteristic(
      BluetoothDevice device, Guid characteristicGuid) async {
    // Get a list of Bluetooth device services
    List services = await device.discoverServices();
    // Enumerate services and their characteristics
    for (BluetoothService service in services) {
      for (BluetoothCharacteristic characteristic in service.characteristics) {
        // Check if the UUID characteristics match
        if (characteristic.uuid == characteristicGuid) {
          // Read characteristic value
          List value = await characteristic.read();
          return value;
        }
      }
    }
    // Throw an exception if the characteristic is not found
    throw Exception('Characteristic not found: $characteristicGuid');
  }
It was necessary to do the same to implement the functionality of rewriting the value of a BLE characteristic, since both in the case of interaction with the SmartPulse device and as part of SmartLight control, the ability to transfer one’s own values must be implemented. In the heart rate monitor, this functionality is tied to recording authentication data in the form of a PIN code in one of the characteristics, and in the lamp, the functionality of switching the operating modes of the device, as well as all functions in manual mode, is thus implemented. If we talk about the code itself, then the logic here is the same as in the case of reading characteristic values. The similarity of the code, both structurally and logically, is noticeable to the naked eye.
// Method for writing to a characteristic
Future writeCharacteristic(
      BluetoothDevice device, Guid characteristicGuid, List value) async {
    List services = await device.discoverServices();
    // Enumerate services and their characteristics
    for (BluetoothService service in services) {
      for (BluetoothCharacteristic characteristic in service.characteristics) {
        if (characteristic.uuid == characteristicGuid) {
          // Write a value to a characteristic
          await characteristic.write(value);
          return;
        }
      }
    }
  }
Since I demonstrated the process of reading the value of a characteristic, I will also show writing to the characteristic.
// Method for sending a message
Future sendTextMessage() async {
    // Get value from text field
    String text = textController.text;
    // Text encoding (UTF-8)
    List value = utf8.encode(text);
    try {
      // Attempt to write to a characteristic
      await writeCharacteristic(
        widget.device,
        Guid('0000fef3-0000-1000-8000-00805f9b34fb'),
        value
      );
    } catch (e) {
      // Error output
      print("Error writing to characteristic: $e");
    }
  }
This is how the transfer of the user's authentication PIN code to the SmartPulse device looks like. After the user ь will write the pin code value into the characteristic with the specified identifier, and a script for checking this value will run in the device firmware. If a match is found, the device will start sending packets with the characteristics of the heart rate sensor and battery charge to the connected device. In the application, they will also be displayed and displayed in the appropriate fields.
After it was possible to provide the ability to work with BLE, all that was left was to give the user the opportunity to see the values of the characteristics and transfer their own. We create a page for the SmartPulse device, which we can go to when connecting to it. In the appropriate fields we will display the values of the heart rate and battery charge variables, which were initially obtained from the characteristics when connected to the device. We also leave a text field so that we can write an authentication pin code in it, which will be sent by the button in whose event handler we register the callsendTextMessage(). We have already discussed this operation above; it implements the process of writing a value into the required characteristic.
@override
  Widget build(BuildContext context) {
    // Use the Scaffold widget to create a basic screen structure
    return Scaffold(
      // AppBar to display the screen title
      appBar: AppBar(
        title: Text('SmartPulse Control'),
      ),
      // Main screen content, centered
      body: Center(
        child:Column(
          // Align column elements
          mainAxisAlignment: MainAxisAlignment.center,
          children: [
            // Display current heart rate
            Text('Pulse: $pulseRate', style: TextStyle(fontSize: 24)),
            // Display current battery level
            Text('Battery charge: $batteryLevel%',
                style: TextStyle(fontSize: 24)),
            // Text input field
            Padding(
              padding: const EdgeInsets.all(8.0),
              child:TextField(
                // Controller to control the text field
                controller: textController,
                decoration: InputDecoration(
                  border: OutlineInputBorder(),
                  labelText: 'Authentication password',
                ),
              ),
            ),
            // Button to send a text message
            ElevatedButton(
              onPressed: () {
                sendTextMessage();
              },
              child: Text('Confirm'),
            ),
            // Button to disconnect from the device
            ElevatedButton(
              onPressed: isDeviceConnected ? disconnectDevice: null,
              child: Text('Disconnect from device'),
            ),
          ],
        ),
      ),
    );
  }
}
For SmartLight, everything is implemented according to the same logic as for SmartPulse. Its functionality implies working with a large number of characteristics, so the code turned out to be much larger than in the case of working with a heart rate monitor, but in fact, structurally there is nothing different in it from the code fragments demonstrated above.
To be able to use BLE when launching and running a mobile application, you need to open the fileRunner.xcworkspaceFlutter project, which is located in the folderios, in Xcode. In the opened project in the development environment, go toinfo.plistand add lines with values"NSBluetoothPeripheralUsageDescription".
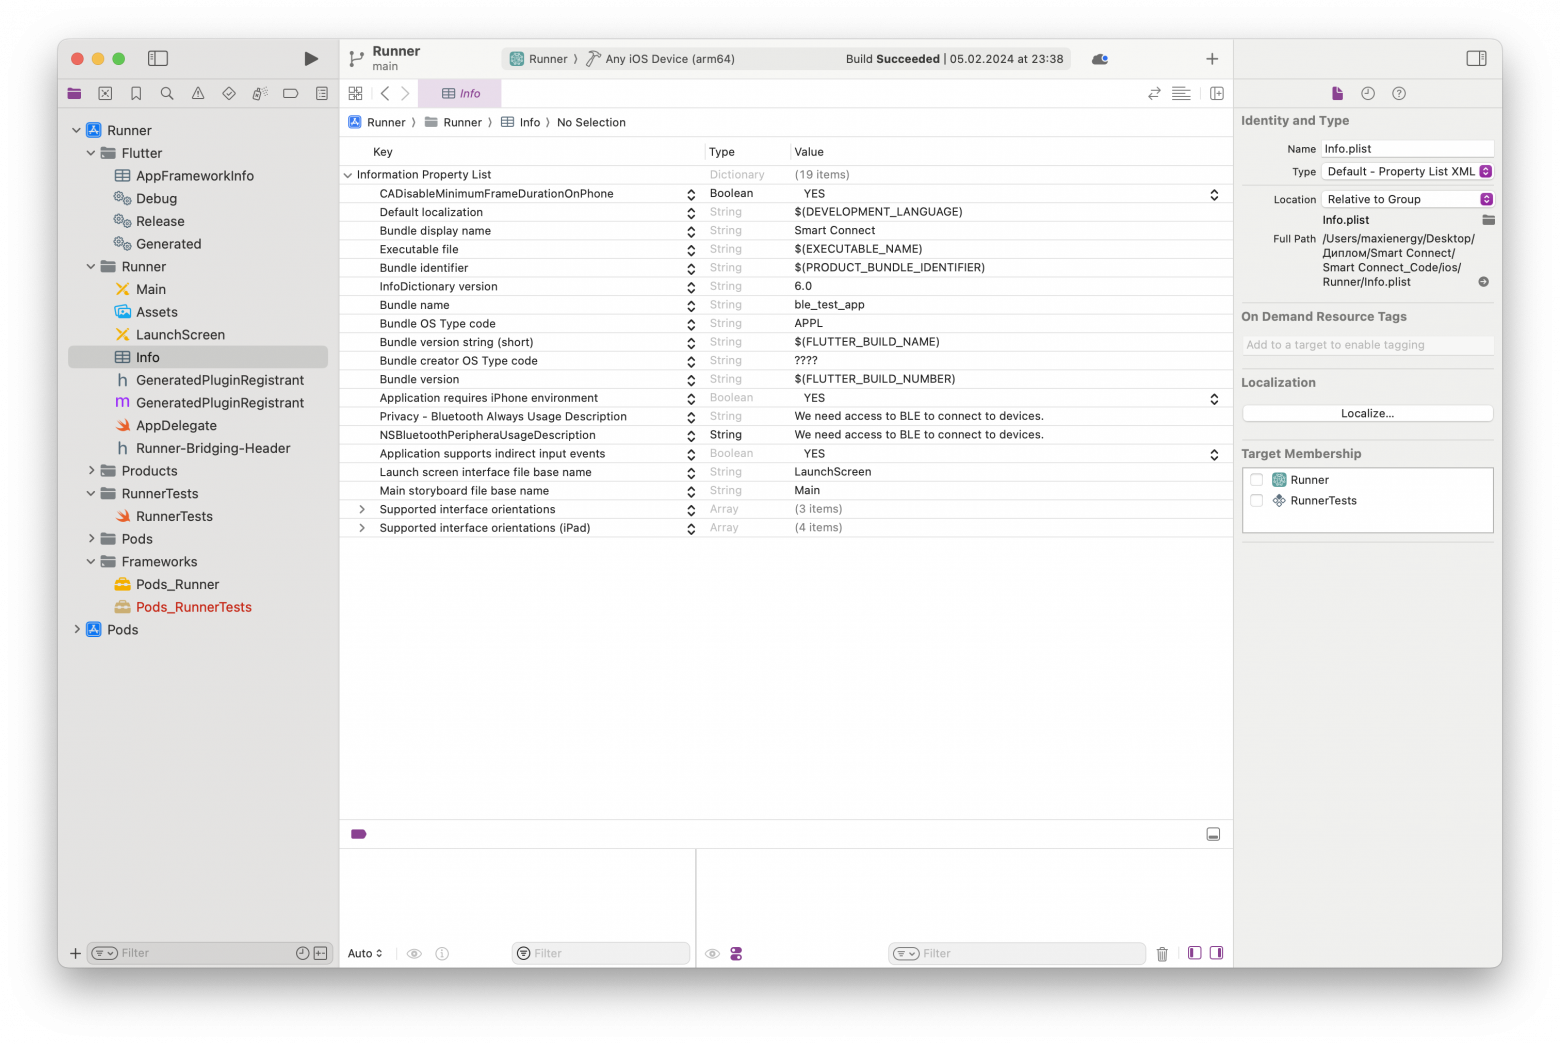
Contents of info.plist
I also apologize to all experienced and knowledgeable mobile application developers and who found it painful to look at my code. This was my first experience with Flutter, please don’t judge me harshly for this.
Mobile application interface
Essentially, the app consists of a home page that contains "tiles" of devices that you can connect to. That is, after launching the application, all BLE devices nearby are scanned and our two devices are searched by the name of the BLE server ( never do that ). If we find any of the devices, we display the tile with it on the main screen so that you can go to the device management screen and, in fact, interact with it.
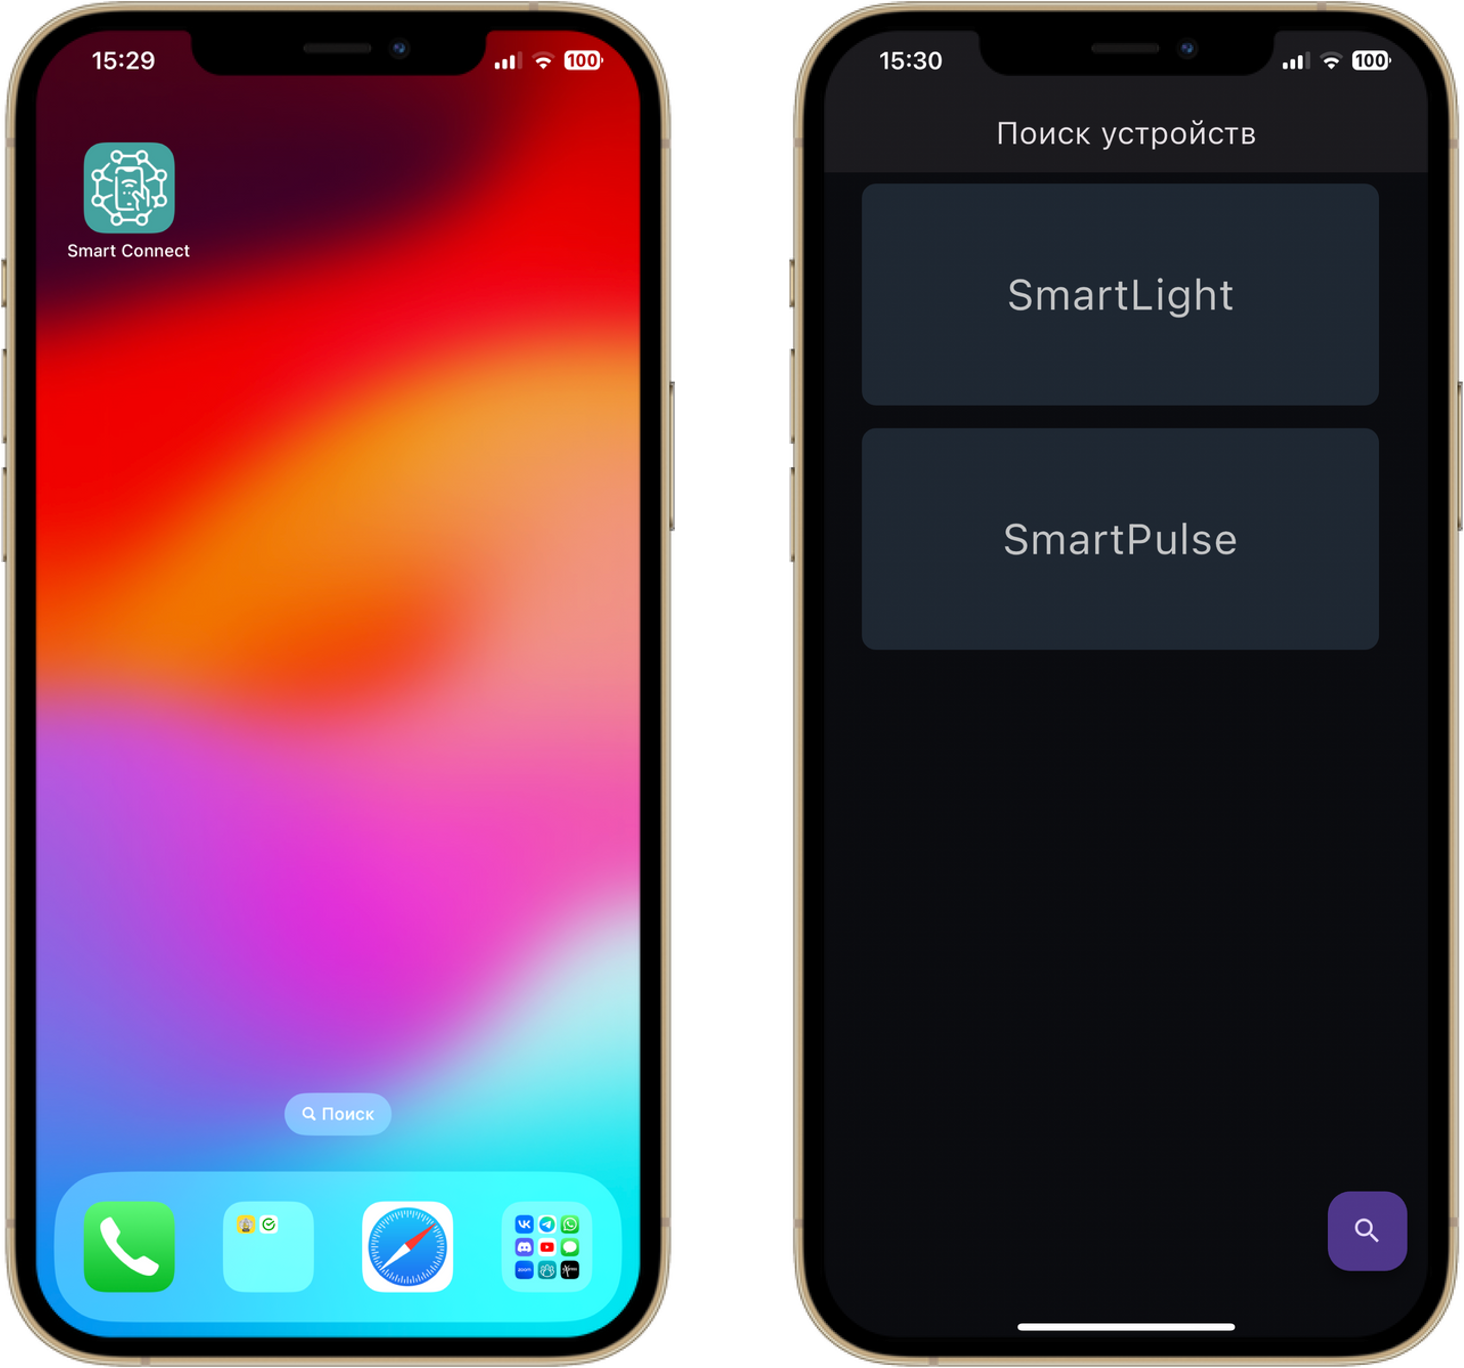
Installed Smart Connect application and start page with IoT devices
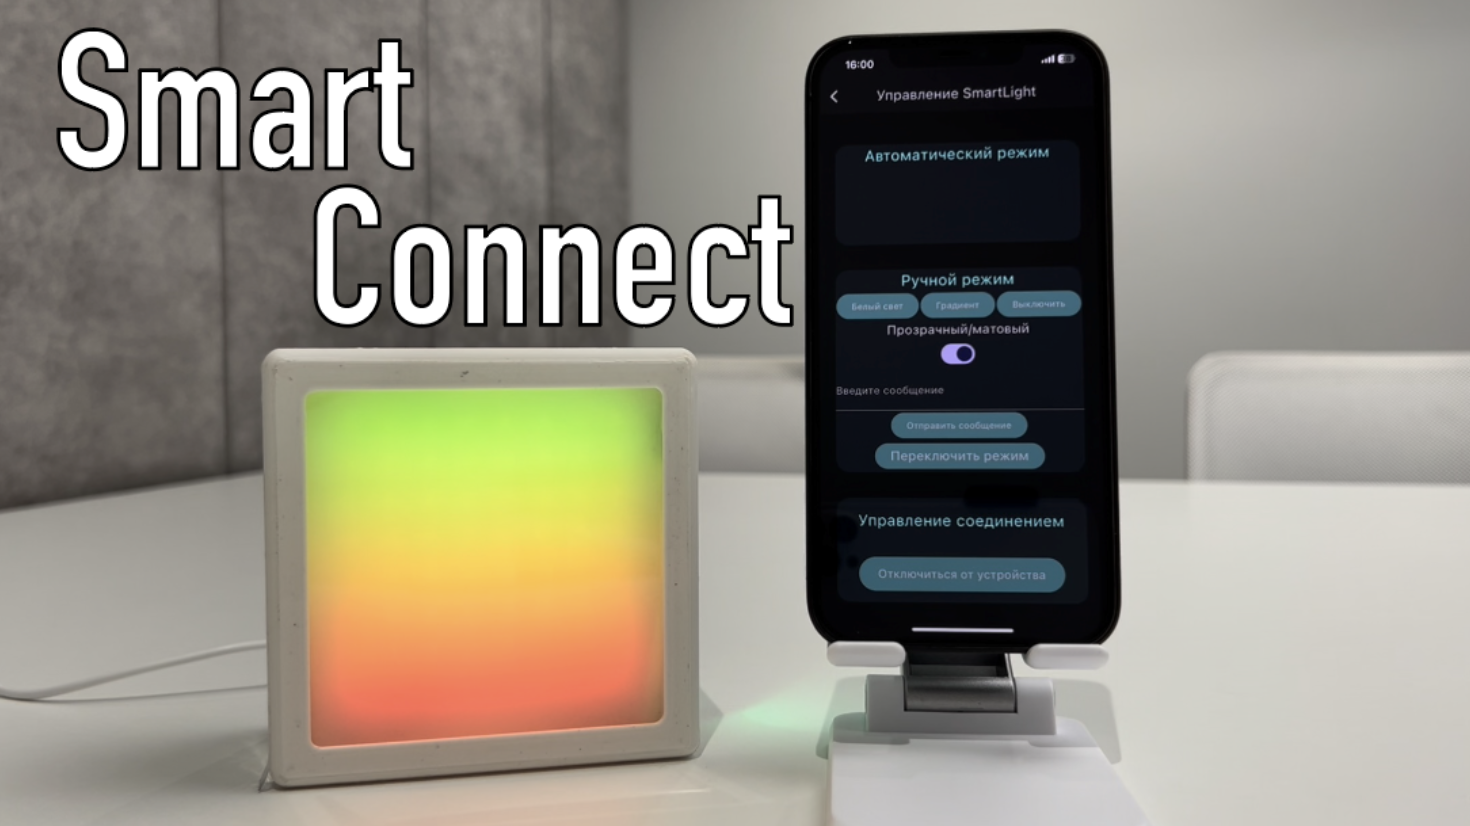
SmartLight control menu
The SmartLight control menu interface includes switching between device operating modes. When you turn on the automatic mode (which is set by default when connecting to the device), the manual mode is blocked, and a similar situation occurs when switching to the manual control mode.
In automatic mode, I left only the button to switch to manual mode, as well as the output of information from the light sensor.
In manual mode, you can turn on the light element on SmartLight using the “White Light” button and turn on the dynamic color gradient using the “Gradient” button. The universal “Turn off” button is needed to turn off the light element of the device, regardless of the effect running on it.
To turn the electrochromic film on and off, I decided to use a toggle switch, which also works with any running effect on the device's LED matrix.
To send a custom message to your device, there is a text field and a "Send Message" button. After entering a message and pressing this button, the device script will be launched, in which the electrochromic film will automatically switch to transparent mode, and the user message will be transmitted to the LED matrix of the device in the form of a creeping line. After the message is displayed, the device will automatically turn off the electrochromic film and go into waiting mode for the next command from the user.
The "Disconnect from device" button simply breaks the connection with SmartLight. In this case, the device will still be available for connection to it through the tile on the main screen of the application.
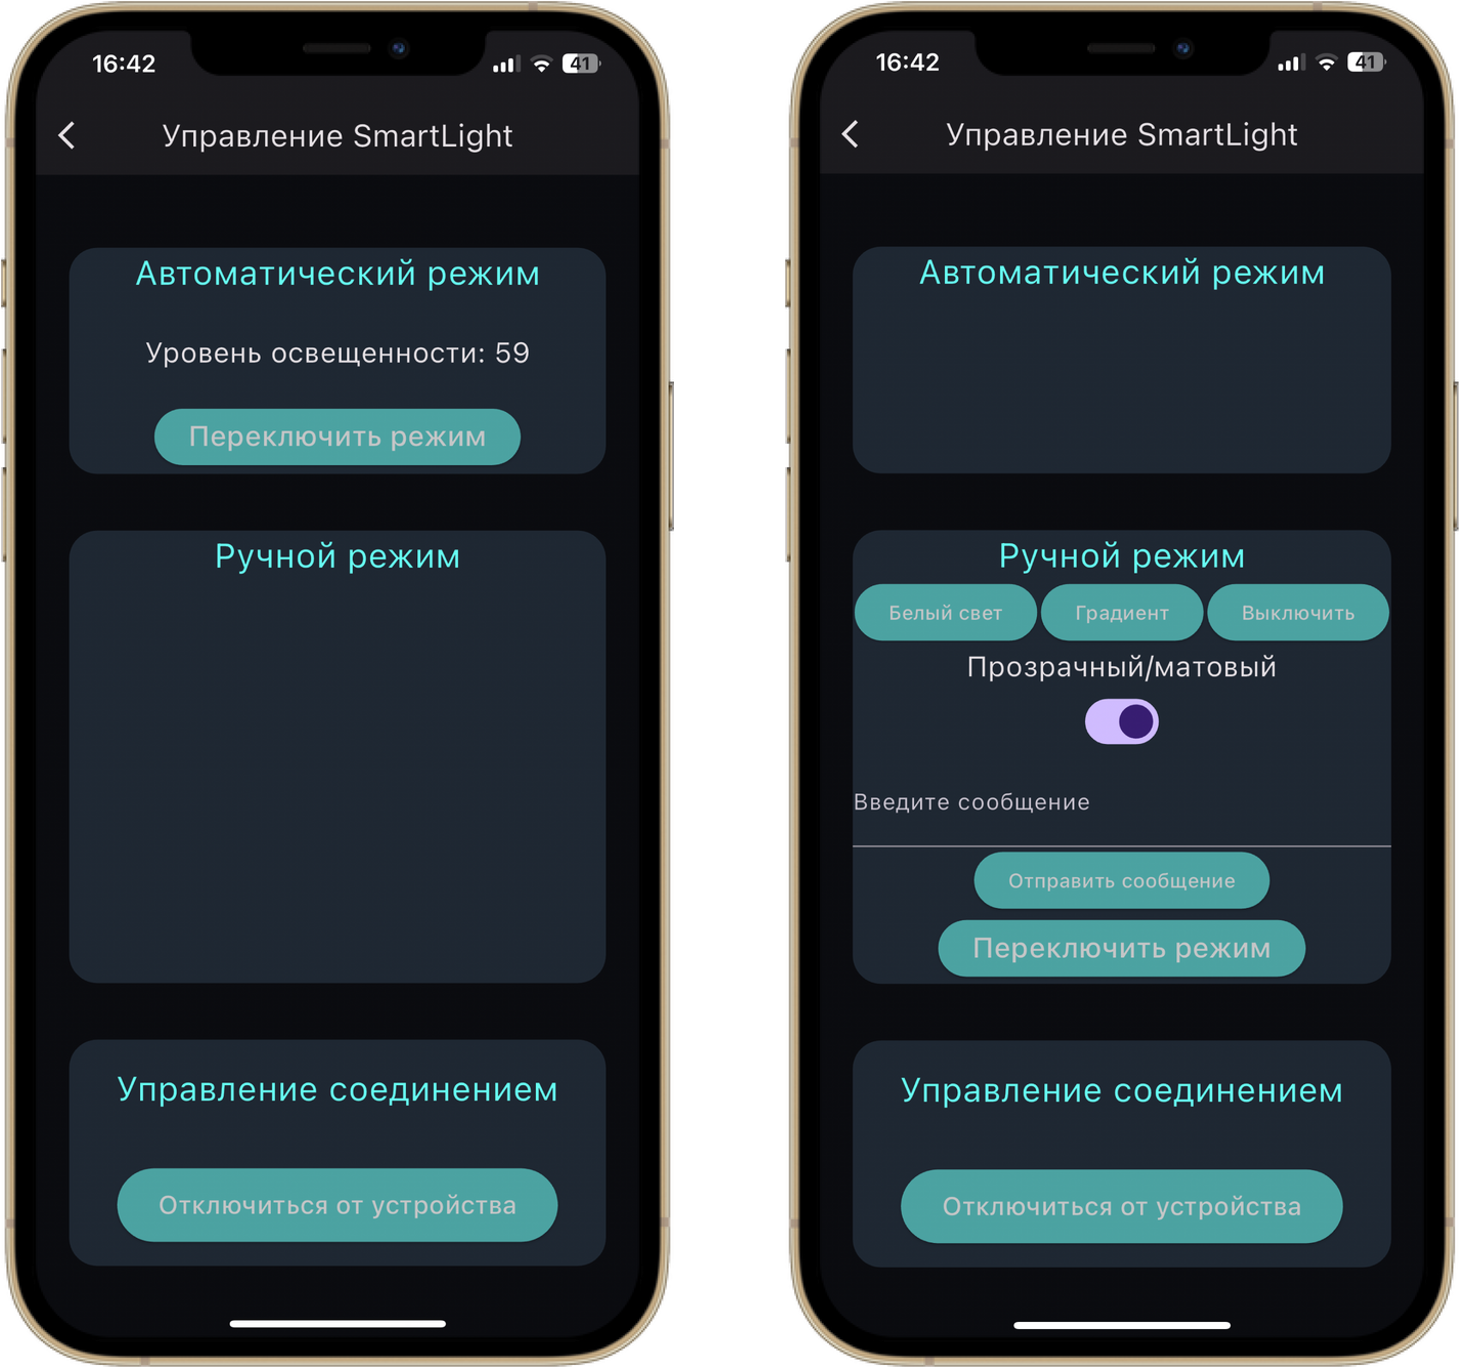
SmartLight device menu interface in automatic and manual control modes
SmartPulse control menu
To interact with the SmartPulse heart rate monitor, I placed a field for entering an authentication pin code, which will be sent to the device as an entry in a separate BLE characteristic. After confirming that the PIN code is correct on the device side, the heart rate and battery charge level of the portable device will be displayed in the corresponding fields on the control screen. Clicking the "Disconnect from device" button disconnects the connection with the heart rate monitor. Moreover, in this case, you can reconnect to the device only after a physical reboot of SmartPulse, which was done as part of limiting the number of connections to the device as one of the protection mechanisms from the security methodology described in the first part of the series of articles.
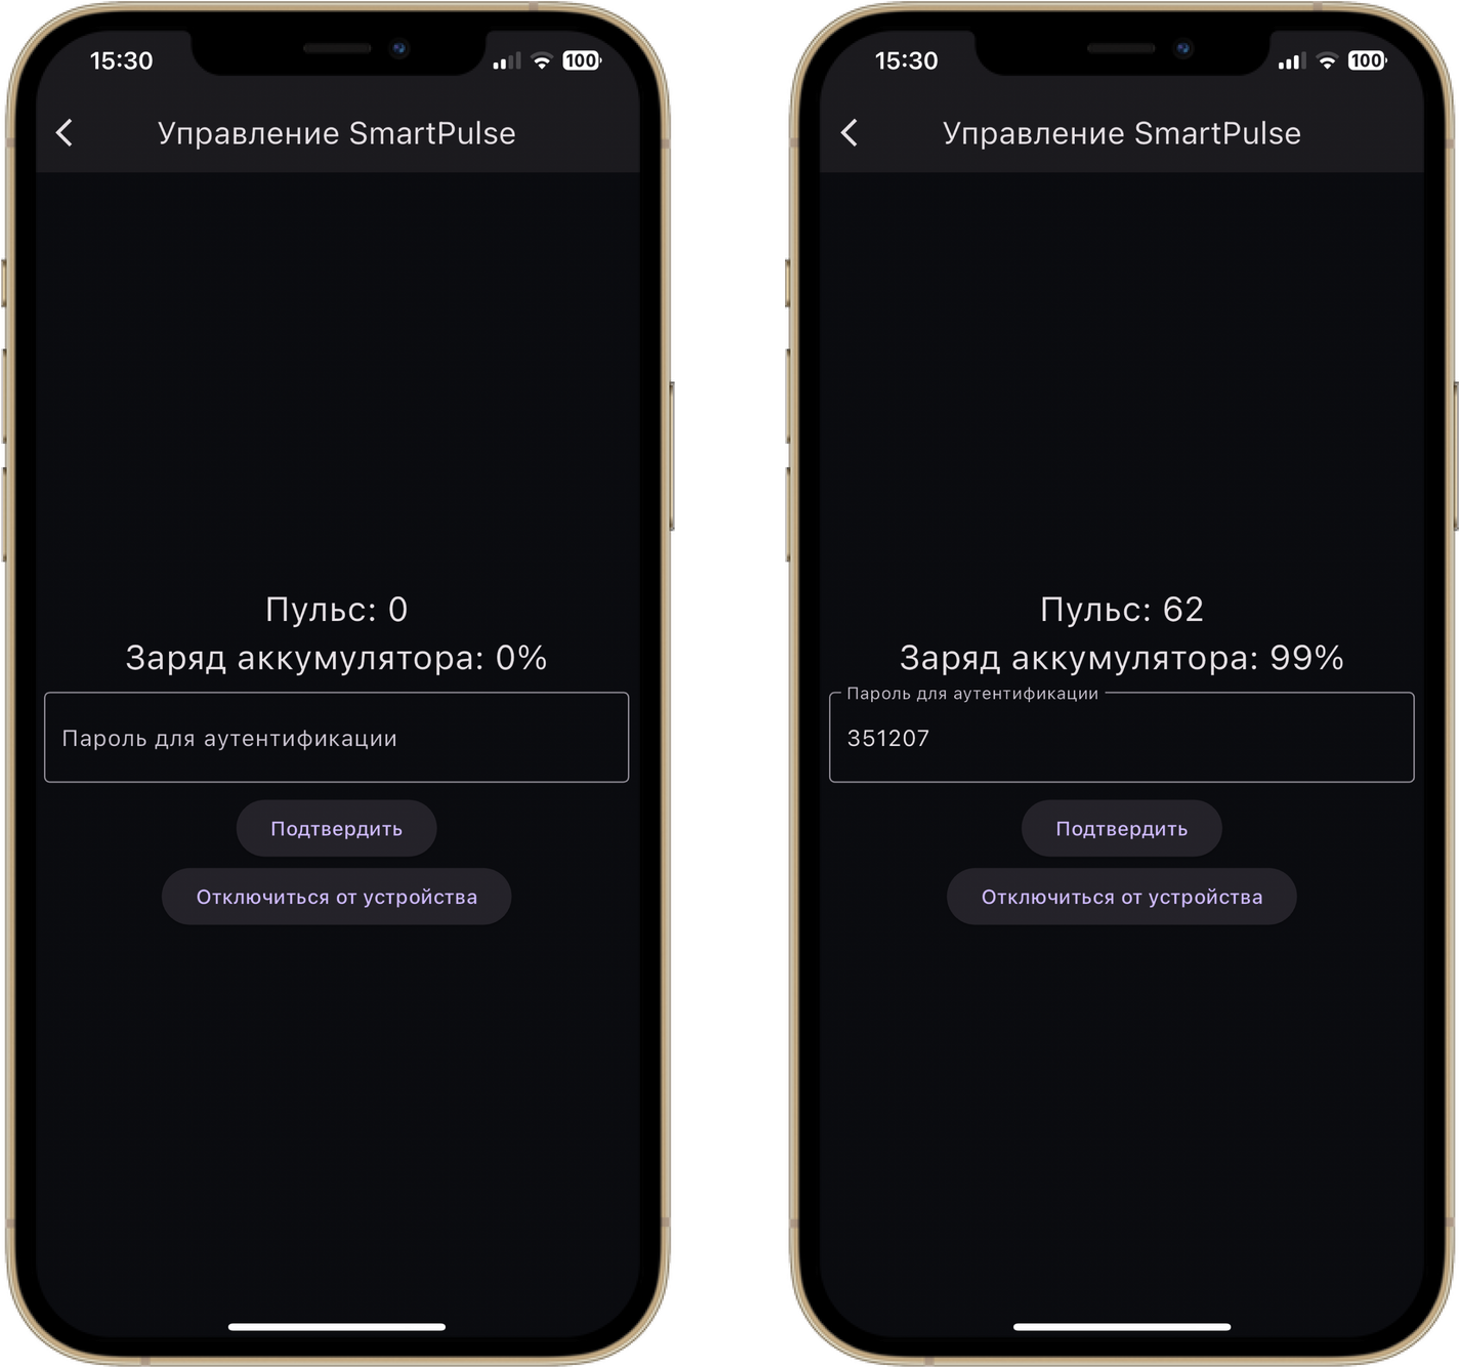
SmartPulse device menu before and after authentication
Demonstration of devices and applications
To clearly demonstrate interaction with Internet of Things devices through a mobile application, I filmed and edited two videos with all the implemented functionality.
To prevent questions like “What’s going on here?” while watching the video, I decided to add time codes (they lead to the corresponding videos on YouTube) with a detailed description and explanation of everything that happens on your screen. Let's start with the SmartLight device.
SmartLight device
00:03-00:39 Script for greeting the SmartLight device when it is turned on. The electrochromic film is automatically turned on so that you can read the greeting, which is displayed on the device in the form of a creeping line. After the script is completed, the device turns off the film and goes into automatic mode.
00:40-00:59 The process of connecting to the device begins when you open the Smart Connect application, when you see the home screen blank. To display devices available for connection on it, you need to start scanning, which is done by clicking the button in the lower corner of the screen. Once the scan is complete, the SmartLight device is displayed, and the tile with its name will take you to the device management screen. When connected to a device on SmartLight, the BLE connection LED will change color from blue to green, which can be seen in the video if you look a little closer. Since the device is set to automatic mode by default, you can see that the light level value (87) was transferred to the application immediately after connection.
01:00-01:05 Turning on the LED matrix of the device in low light conditions in automatic operating mode. Light level values also dropped from 87 to 50, which can be seen in the application.
01:06-01:20 Switching the device operating mode from automatic to manual and turning on/off the LED matrix about the button in the application.
01:21-01:38 Launch a gradient glow effect on your device.
01:39-01:53 Turn electrochromic film on and off using the app.
01:54-02:25Transmitting a user message to the device’s LED matrix in the form of a creeping line. In the text field on the screen of the mobile application we write the message “Hello, Habr!” and send it using a button to the device. A greeting-like scenario is triggered with the electrochromic film automatically turning on and off.
02:26-02:30 Disconnecting the connection with the device using a button in the application.
SmartPulse device
To demonstrate how the application works with a heart rate monitor, I reconnected Anya ( @ShabrovaAS ), because it was more convenient to shoot, and she didn’t really resist it.
00:04-00:14 Turn on the SmartPulse device. When the device booted up, a pin code "298980" was generated for authentication in the application.
00:15-00:19 Determination of heart rate and battery charge with information displayed on the OLED display of the device by touching the touch sensor.
00:20-00:30 Connect to the device using a mobile application. Everything here is similar to the same stage in the SmartLight demonstration. Information on heart rate and charge level is not displayed in the application, since the authentication pin code has not yet been entered.
00:31-00:49 Authentication using a generated PIN code. Enter the pin code “298980” in the appropriate field and write it into the characteristics using the button. After checking for correctness, services are launched with pulse and battery charge characteristics, the values of which are displayed on the SmartPulse control screen in the application.
00:50-00:54 Disconnect from the device. Nothing is cleared on the screen (should have been done, but I didn't), but the new values are no longer displayed in the application. If you look closely at the device display, you can see that the pulse has changed, but after disconnecting from SmartPulse in the application, the new value was no longer transferred to the smartphone.
The next part of this series of articles will discuss the process of gaining unauthorized access to the previously created SmartLight and SmartPulse IoT devices, as well as sum up the results of protecting and writing my thesis.
I am grateful to everyone who took the time to read this article. I would be incredibly happy to receive feedback in the form of comments in order to improve the quality of the material.
What's next?
Since the thesis turned out to be quite voluminous, I decided to break it into several related articles:
Information Security Specialist Diploma. Part No. 2 - Stationary SmartLight device
Information Security Specialist Diploma. Part #3 - SmartPulse portable device
Spezia Diploma IB sheet. Part No. 4 - Smart Connect mobile application
Information Security Specialist Diploma. Part #5 - Unauthorized access to IoT devices with BLE
With the original VKR can be found here
Discussion
Comments
Comments are available only to confirmed email subscribers. No separate registration or password is required: a magic link opens a comment session.
Join the discussion
Enter the same email that you already used for your site subscription. We will send you a magic link to open comments on this device.
There are no approved comments here yet.